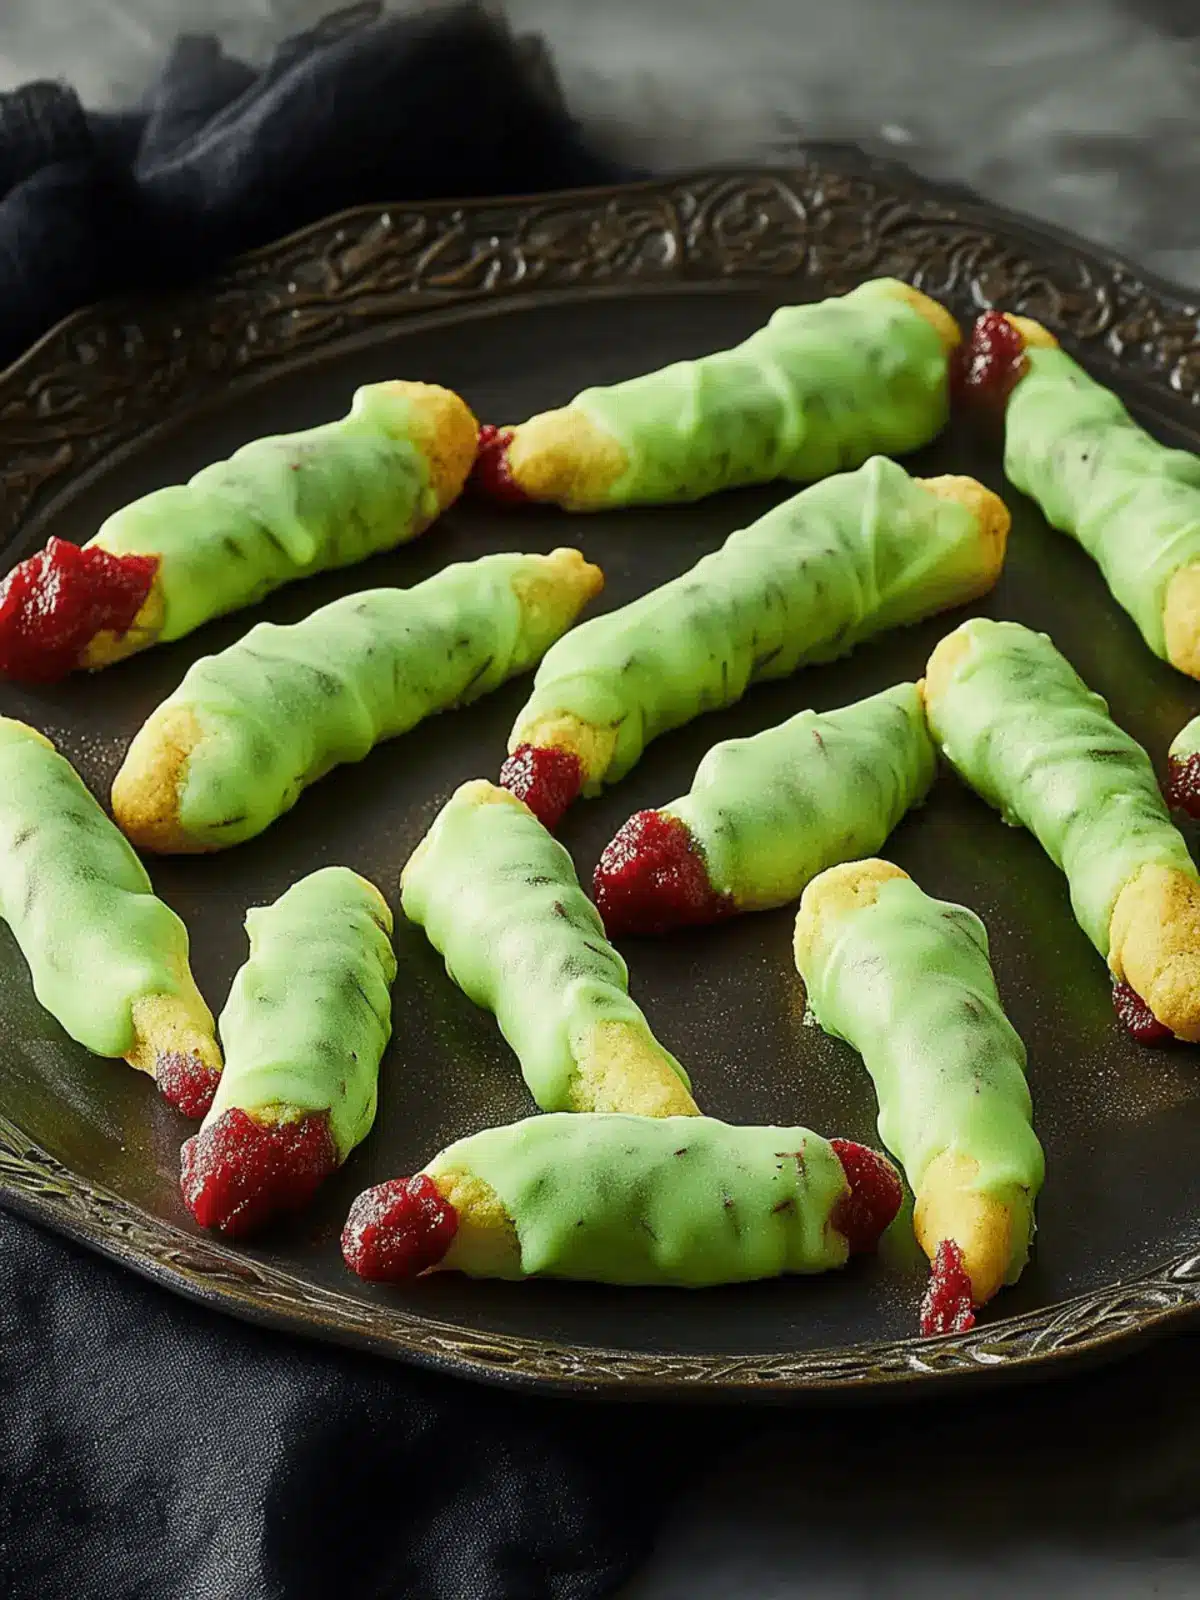
As Halloween approaches, the excitement in the air is contagious, and so is the craving for deliciously eerie treats! This year, I decided to whip up some spine-chilling Witch Finger Cookies that are both frightfully fun and irresistibly tasty. Imagine gathering around with friends or family, a platter of these nutty, tender shortbread cookies on the table, each one a perfectly crafted severed finger—dyed green for that extra ghastly effect! Topped with almond nails and a gruesome drizzle of oozy jam, they’re the ultimate conversation starters that’ll have everyone gasping in delight.
What makes these cookies truly stand out is not just their spooky appearance but their blend of flavors and textures too. The rich shortbread base paired with a hint of almond and a chewy center ensures that your Halloween isn’t just about scares but also about indulgent sweet treats. So, let’s get ready to bake these creepy cookies, make some sweet memories, and perhaps even start a new Halloween tradition!
Why Make Witch Finger Cookies This Halloween?
Delightfully Spooky: These Witch Finger Cookies make any Halloween gathering unforgettable with their eerie yet delicious appearance. Rich, Nutty Flavor: A combination of tender shortbread and almond creates a flavor that is both unique and comforting. Perfect for All Ages: Kids and adults alike will find them irresistibly fun, making them a hit at parties. Versatile Decorations: You can customize the “blood” jam and find creative ways to make them even more chilling! Easy to Prepare: With simple ingredients and straightforward steps, you’ll whip up these cookies quickly, leaving more time for Halloween festivities. Dive into the spooky spirit by making these delightful treats!
Witch Finger Cookies Ingredients
-
For the Dough
-
Confectioners’ Sugar – Adds sweetness and a light texture; can substitute with granulated sugar, but texture may differ.
-
Unsalted Butter (2 sticks) – Provides richness and helps with cookie structure; margarine can be used for a dairy-free option.
-
Large Egg – Binds the ingredients together and adds moisture; a flax egg may be used as a vegan substitute.
-
Almond Extract (1 tsp) – Infuses a nutty flavor; vanilla extract can be used instead for a different twist.
-
Pure Vanilla Extract (1 tsp) – Enhances the overall sweetness and flavor complexity; optional but recommended.
-
Green Food Coloring (5-6 drops) – Gives the cookies their creepy color; opt for natural food coloring for a more organic version.
-
All-Purpose Flour (2 3/4 cups) – The main structural component for the cookie; whole wheat flour can be used for a healthier twist, adjusting the liquid as necessary.
-
Kosher Salt (1 tsp) – Balances the sweetness and elevates flavor; regular salt is a suitable substitute.
-
Finely Chopped Pistachios (1/2 cup) – Adds texture and visually resembles “warts”; chopped almonds or walnuts may work in a pinch.
-
For Decoration
-
Sliced Almonds (3/4 cup) – Serve as the “fingernail” on each cookie; whole almonds or chocolate chips can be used for variation.
-
Cherry, Strawberry, or Raspberry Jam (1/2 cup) – Simulates “blood” for decoration; other jam varieties can create different visual effects.
Get ready to create some eerily delightful Witch Finger Cookies that will captivate your guests, all while filling your kitchen with warm, inviting aromas!
How to Make Witch Finger Cookies
-
Prepare Dough: In a large bowl, beat together the confectioners’ sugar and unsalted butter until the mixture is fluffy and light. Then blend in the large egg, almond extract, pure vanilla extract, and green food coloring for that ghoulish hue.
-
Combine Dry Ingredients: In a separate bowl, whisk together the all-purpose flour and kosher salt. Gradually add this dry mix to the butter mixture on low speed, stirring gently until combined. Fold in the finely chopped pistachios for extra crunch and texture.
-
Chill: Wrap the dough tightly in plastic wrap and refrigerate for at least 30 minutes. If you’re planning ahead, you can chill it for up to 48 hours for easier handling later.
-
Shape Cookies: Once chilled, roll the dough into finger-shaped logs, making sure to pinch in the middle for knuckles and pressing a sliced almond into the end of each one to resemble a fingernail.
-
Freeze and Bake: To help maintain the shape, freeze the formed cookies for 30 minutes. Bake them in a preheated oven at 375°F for 7 to 9 minutes, or until the edges are firm and lightly golden.
-
Decorate: Allow the cookies to cool on a wire rack. Once they have cooled, add a dollop of jam to the tip of each “finger” and replace the almond for an extra spooky effect that looks just like oozy “blood.”
Optional: Consider adding a sprinkle of chopped nuts for added texture.
Exact quantities are listed in the recipe card below.

How to Store and Freeze Witch Finger Cookies
- Room Temperature: Keep baked Witch Finger Cookies in an airtight container for up to 3 days. This retains their delightful texture and prevents them from getting stale.
- Fridge: If you prefer a longer storage option, refrigerate the cookies in an airtight container for up to a week, ensuring they stay fresh and tasty.
- Freezer: For longer-term storage, freeze the baked cookies in a single layer on a baking sheet, then transfer to a freezer-safe bag for up to 3 months. Thaw before serving.
- Dough Storage: If you want to prep ahead, the dough can be stored in the fridge for up to 2 days or frozen for up to 3 months. Just remember to wrap it well to prevent freezer burn!
Expert Tips for Witch Finger Cookies
-
Chill the Dough: Make sure to chill the dough thoroughly before shaping. This helps the cookies hold their form during baking without spreading.
-
Don’t Overbake: Keep an eye on your cookies; they should be firm around the edges but still soft in the center. Overbaking can lead to a tough texture.
-
Knuckle Detail: For that gruesome effect, carve knuckle grooves into the dough before baking. This attention to detail really enhances the spooky look of these Witch Finger Cookies.
-
Jam Variety: Experiment with different jam flavors for the “blood” effect. Raspberry or even blueberry jam can add surprise and delight at your Halloween gathering.
-
Nut Substitutions: If you’re out of pistachios, don’t fret! Chopped almonds or walnuts can also work well for those pesky “warts,” ensuring a frightfully fun look no matter what you have on hand.
Witch Finger Cookies Variations
Customize your treats and unleash your creativity in the kitchen with these spooky twists on the classic Witch Finger Cookies!
-
Nut-Free: Replace pistachios and sliced almonds with sunflower seeds for a nut-free alternative. They’ll still add a pleasant crunch without the allergens.
-
Color Variations: Instead of green, try using purple or orange food coloring to match different Halloween themes. Your cookies will become a colorful highlight on any dessert table.
-
Spiced Up: Add a dash of cinnamon or nutmeg to the dough for a warm spice flavor that contrasts deliciously with the sweet jam.
-
Gluten-Free: Substitute the all-purpose flour with a gluten-free flour blend to cater to gluten-sensitive guests while still enjoying that classic cookie texture.
-
Choco-Fingers: Add mini chocolate chips to the dough for extra richness. This delightful addition complements the sweet jam and almond flavors perfectly.
-
Vegan Twist: Swap the egg for a flax egg and use vegan butter to make these cookies suitable for your vegan friends without losing flavor or texture.
-
Jam Variety: Use different types of jam or even chocolate ganache for the “blood” effect. This variation lets you create unique taste experiences with every batch.
-
Spooky Sprinkles: Decorate the cookies with Halloween-themed sprinkles before baking. These charming touches will make your cookies even more eye-catching!
Make Ahead Options
These Witch Finger Cookies are perfect for meal prep and can save you precious time during the Halloween hustle! You can prepare the dough up to 48 hours in advance by wrapping it tightly in plastic wrap and refrigerating it, ensuring it stays fresh and easy to handle. If you’d like to prepare even further, feel free to roll the shapes and freeze them for up to 3 months; just be sure to separate the cookies with parchment paper to prevent sticking. When you’re ready to bake, simply pop them in the oven from frozen, adding an extra minute or two to the baking time. The final result? Just as spooktacular and delicious, with minimal effort!
What to Serve with Witch Finger Cookies?
Get ready to elevate your Halloween festivities with delightful combinations that will leave your guests both spooked and satisfied!
-
Themed Cocktails: Create witchy drinks like green punch or dark berry cocktails to complement the eerie look of the cookies. A little fizz can add a festive touch!
-
Spooky Fruit Salad: Toss together chunks of apple, grapes, and berries for a refreshing side that balances out the sweet cookies. A sprinkle of lime juice brings a zesty flair!
-
Pumpkin Soup: Warm, velvety pumpkin soup drenched in spices brings warmth and comfort to the table, perfect for creating a cozy atmosphere amidst the spooky vibes.
-
Chocolate Dipped Strawberries: Create a delicious contrast with strawberries dipped in dark chocolate. They’re easy to eat and add a touch of elegance to your Halloween spread.
-
Ghoulish Cheese Platter: Include a premium selection of cheeses, crackers, and some spooky-shaped veggies to provide savory bites that complement the sweet cookies beautifully.
-
Ghostly Meringue Cookies: Light and airy, these meringues shaped like ghosts delightfully contrast the nutty richness of Witch Finger Cookies, making for a fun dessert variety.
-
Black Coffee or Hot Cocoa: A warm drink can comfort your guests and enhance the flavors of the cookies. Consider serving them with a splash of orange liqueur for pumpkin-spice vibes.
Pairing these treats with your Witch Finger Cookies ensures a Halloween gathering filled with deliciously memorable moments!

Witch Finger Cookies Recipe FAQs
What should I look for when selecting ingredients for Witch Finger Cookies?
Absolutely! When choosing ingredients, select fresh almonds with no dark spots for the nails and vibrant, fresh green food coloring for that spooky hue. Ensure the butter is at room temperature for easy creaming, and don’t skip on the quality of your jam; it should be rich and flavorful to really resemble blood!
How should I store Witch Finger Cookies after baking?
You can keep your baked Witch Finger Cookies in an airtight container at room temperature for up to 3 days to keep them fresh. If you want to extend their life, refrigerate them in an airtight container for up to a week. I often prefer to use clear containers so that guests can admire their spooky charm!
Can I freeze Witch Finger Cookies?
Yes! For longer storage, freeze your baked Witch Finger Cookies in a single layer on a baking sheet until firm, then pack them in a freezer-safe bag or airtight container. They can be stored this way for up to 3 months. When you’re ready to enjoy, simply thaw them at room temperature, and they’ll be just as delicious as the day you baked them!
What if my cookie dough is too sticky or dry?
Very! If your dough is too sticky, try chilling it for 15-30 more minutes. On the flip side, if it’s too dry and crumbly, gradually incorporate a little milk or egg yolk—a tablespoon at a time—until you reach a malleable consistency. This ensures that your cookies will hold their form beautifully!
Are Witch Finger Cookies safe for pets or those with nut allergies?
Great question! Unfortunately, these cookies are not pet-friendly due to the almonds, and people with nut allergies should avoid them as well. If you’re baking for someone with allergies, you could experiment with sunflower seed butter in place of almond extract to create a base that’s safe for all to enjoy. Just be sure to inform your guests about your ingredient choices!
What kind of “blood” jam should I use for decoration?
Absolutely! You can choose between cherry, strawberry, or raspberry jam for that oozy effect. Each type brings its own unique flavor—raspberry adds a tart twist while cherry offers a rich sweetness. I often experiment with a mix of jams for a vibrant display! If you’re feeling adventurous, you could warm the jam slightly to achieve a more ‘runny’ effect that oozes out beautifully.
This will make your Witch Finger Cookies the highlight of your Halloween celebrations while ensuring that everyone has the chance to enjoy them!

Spooky Witch Finger Cookies Perfect for Halloween Fun
Ingredients
Equipment
Method
- Prepare Dough: In a large bowl, beat together the confectioners' sugar and unsalted butter until fluffy. Blend in the egg, almond extract, vanilla extract, and food coloring.
- Combine Dry Ingredients: In a separate bowl, whisk together flour and kosher salt. Gradually add dry mix to the butter mixture, stirring until combined. Fold in the chopped pistachios.
- Chill: Wrap the dough in plastic wrap and refrigerate for at least 30 minutes.
- Shape Cookies: Roll the dough into finger-shaped logs, pinch in the middle for knuckles and press a sliced almond into each end.
- Freeze and Bake: Freeze the cookies for 30 minutes. Bake in a preheated oven at 375°F for 7-9 minutes.
- Decorate: Allow cookies to cool, then add a dollop of jam to the tip of each finger and replace the almond.


